Welcome to the first part of the Adding Landed Titles guide, where I shall be showing you the method of adding your own titular duchies, kingdoms, and empires. Part 2 of this guide will be showing you how to add formable de jure titles in the same vein as the Kingdom of Ireland or the Empire of Francia. Meanwhile, Part 3 will show you the ins and outs of adding a new title that can be selected from the new game map, complete with its own history, characters, and culture. Before we begin, I recommend setting up your mod directory first; as I shall be assuming that you have already done so, and this guide is building upon the knowledge that you would have gained from that guide.
Programs Used[]
Notepad++ - A free text editing program that's very useful for programming and scripting. (Though Notepad works well enough.)
Paint.NET - A free image editing program that's focussed on editing photo's, but it works well enough for our purposes.
The landed_titles File[]
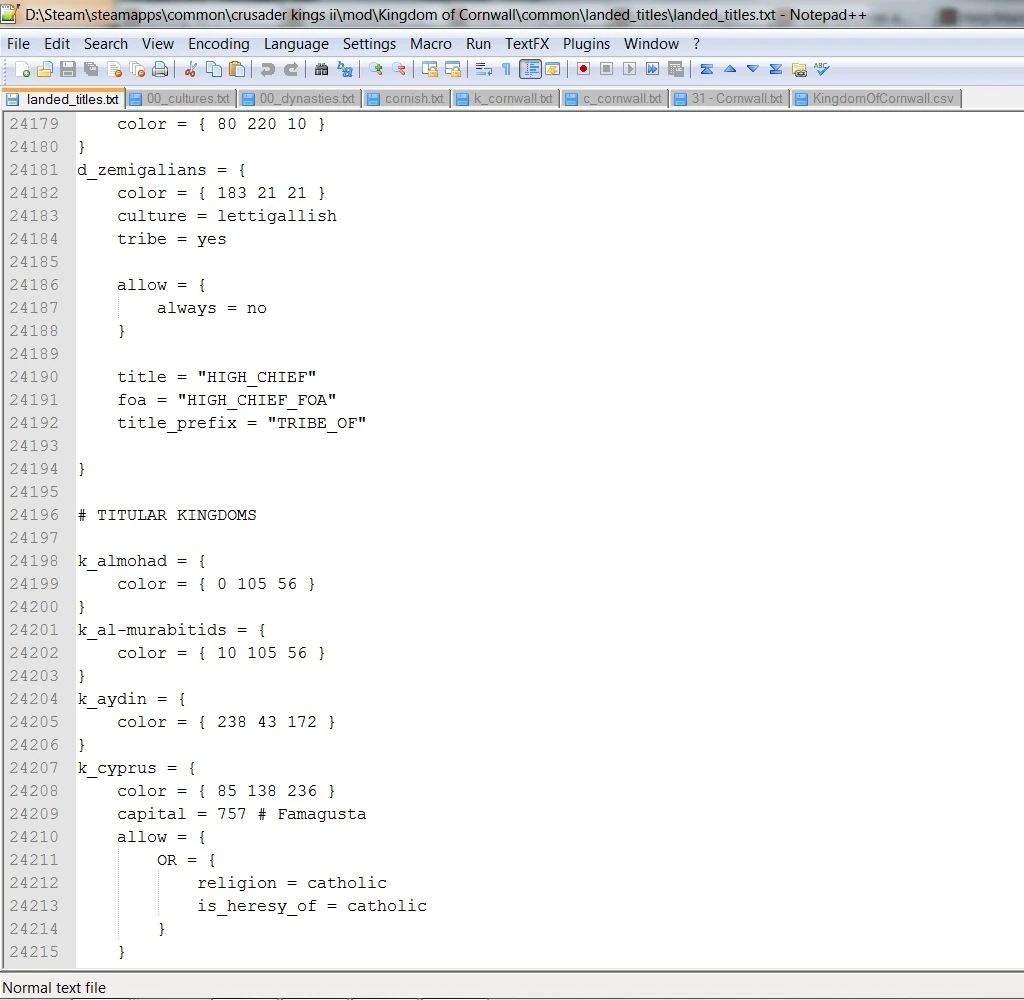
The first file that we shall be modifying is the landed_titles text document found in common\landed_titles. This single file determines what each title is a de jure part of, any creation prerequisites, and other details such as a title's capital and culture. However, we are not dealing with anything to do with de jure titles today, so scroll all the way to the bottom of the file until you hit the titular duchies/kingdoms/empires section. For this guide I'll be adding a titular kingdom, but you can add a titular duchy or empire if you want while following this guide because the method for adding them is exactly the same.
This is what I'm seeing, and you should have something very similar:
k_almohad = {
	color = { 0 105 56 }
}
k_al-murabitids = {
	color = { 10 105 56 }
}
k_aydin = {
	color = { 238 43 172 }
}
k_cyprus = {
	color = { 85 138 236 }
	capital = 757 # Famagusta
	allow = {
		OR = {
			religion = catholic
			is_heresy_of = catholic
		}
	}
}
As you can see from the first three entries, a titular title entry can be very basic. The k_cyprus entry, however, is showing a little more complexity. Lets break this down section-by-section.
k_cyprus = {
Any entry will begin by defining its internal name. The internal name is the name used by the game engine itself to keep track of the title; later on I'll be showing you how to attach the external name (what players will see) to this internal name. You'll also have noticed that every duchy entry starts with d_, kingdom entries with k_, and empire entries with e_. It's important to stick with this naming scheme as it helps with navigating this file, and it helps with finding the correct entry when it come to things like c_cornwall and d_cornwall (and what I'll be adding: k_cornwall).
color = { 85 138 236 }
This is fairly self-explanatory, as we are defining the title's colour. This is done by RGB values (Red, Green, Blue). You can also define a secondary colour by using color2 = { R G B }, of course replacing R, G, and B with numbers. Keep in mind that the accepted range of numbers is 0 to 255, with 0 being none of that respective colour and 255 being that colour in full. So { 0 0 0} is pure black, while { 255 255 255 } is pure white.
This Wikipedia page has a nice list of colours.
capital = 757 # Famagusta
Again, this is fairly self-explanatory. This line is telling the game what a title's default capital county will be. For titular titles, this defines the county that needs to be held for their creation. The number is the same number used for a province, so 31 is Cornwall (you can find a list by going to history\provinces). The sharp character after the number is used to mark that anything after it is a comment. A comment is not read by the game, and it is simply there for the person modifying the file to make it easier to remember details. In this case we can see that it is being used to remind the reader that province 757 is Famagusta. I seriously recommend that you use comments in your work because it allows you to work faster (by not having to check what those numbers mean), and it allows others to immediately know what you are refering to.
By adding a capital to a titular title we are telling the game that a character must control this province to be able to have the option of creating the title. This is similer to how you need at least 50% of a de jure title's territories to be able to create or usurp it.
allow = {
        OR = {
                religion = catholic
                is_heresy_of = catholic
        }
}
This section is basically saying that you have to be Catholic, or a heresy of Catholicism, to be able to create this title. The allow line is always used to denote any extra prerequisites that you might what to add.
Implementing Your Title[]
Now that we know the most commonly used lines involved in creating a titular title, lets try them out.
k_cornwall = {
	color = { 20 20 20 }
	capital = 31 # Cornwall
	culture = breton
}
I've given my entry an appropriate name, while still following the naming convention set out in the rest of the file. color = { 20 20 20} will be telling the game to use a dark grey for this title. capital = 31 is setting the County of Cornwall to be this title's capital; note that I've kept the comment so that I have a quick reference for what province 31 is supposed to be. Finally, I've used the new line culture = breton. This defines the default culture for the title. However, it's not necessary for a title to work.
Once you've added your title, lets save and load up the mod to give it a quick test! If everything's been done correctly then the game should load up without any issues and when you load a game you should be able to see a "Titles can be created" alert. Congratulations! You've added your very first title to the game; hopefully the first of many. However, you would have noticed that the game is using the internal name. Why is this?
The localisation File[]
It's because we haven't defined an external name via a localisation file. Unlike for landed_titles, we can safely create a brand new localisation text document in the localisation folder. I've created mine as KingdomOfCornwall. Back in the Setting up a mod guide we had to change the file type of a .txt file to a .mod file, and we've got to do a similar thing here as well. But this time it's to a .csv file rather than a .mod file. Once you have changed the file type, load it up, as well as any one of Paradox's localisation files back in the main CK2 directory. We'll need to be copying this line:
#CODE;ENGLISH;FRENCH;GERMAN;;SPANISH;;;;;;;;;x;
To your localisation file. This is a useful line to keep in each of your localisation files because it provides a template to add new lines from. Now copy it to the second line as well and delete the sharp character at the start of the line. Currently it's telling the game to replace every possible instance of the internal name CODE with either the external names ENGLISH, FRENCH, GERMAN, or SPANISH depending on what language the player is using. We don't want this, so replace CODE with your title's internal name, and replace ENGLISH with whatever your title is supposed to be named.
k_cornwall;Cornwall;Cornwall;Cornwall;;Cornwall;;;;;;;;;x;
This is my line, and as you can see I've also replaced the other languages, though I haven't bothered to translate them.
Interestingly, you do not need to add a replace path line in your .mod file for your localisation file for it to work. In fact doing so will prevent other localisation files from being loaded.
Conclusion[]
The framework of your titular title has been completed. Though one final thing you can do to add polish to the title is to give it a flag. The quickest way to do this is to go into gfx\flags and copy the flag that you like, and then rename it to match your title's internal name. If you want to create your own, then you must ensure to save it as a 24-bit TGA file that's 128x128 pixels.
This is it for part one of the Adding Landed Titles guide. Before moving on to part two I recommend adding more titles so that the process will become intuitive for you, and try experimenting a little with the things that this guide didn't cover. For more information, visit the landed_titles file page.
References[]
http://www.youtube.com/watch?v=ZE7A-EIZakA - A nicely done video by ParadoxianLP that helped me a lot. If you ever read this, thanks for taking your time to make the video!
| Modding Guides | |
|---|---|
|
Getting Started |
Setting up a mod • Adding Landed Titles, Part 1 |
|
Intermediate Guides |
Adding Landed Titles, Part 2 • Adding Landed Titles, Part 3 • Custom music (playlist) in Crusader Kings II • Editing Save Files |